
Many people are currently asking questions about Google Analytics 4 (GA4).
When will it start?
When will the older Universal Analytics stop being usable?
Is it hard to set up Google Analytics 4?
Our goal here is to bring together some information we’ve found to help you sort this out yourself, as simply and quickly as possible.
We’ll start with a step by step below, then underneath that we’ve pulled together other videos and resources to help you as well.
From Google:
“Google Analytics 4 is our next-generation measurement solution, and it’s replacing Universal Analytics. On July 1, 2023, standard Universal Analytics properties will stop processing data. We strongly encourage you to make the switch to Google Analytics 4 as soon as possible.”
Before we go too deep, it’s also worth checking this article HERE from Google about the migration from Universal Analytics to GA4.
Let’s work through the process of setting up GA4
Setting up Google Analytics 4 involves the following steps:
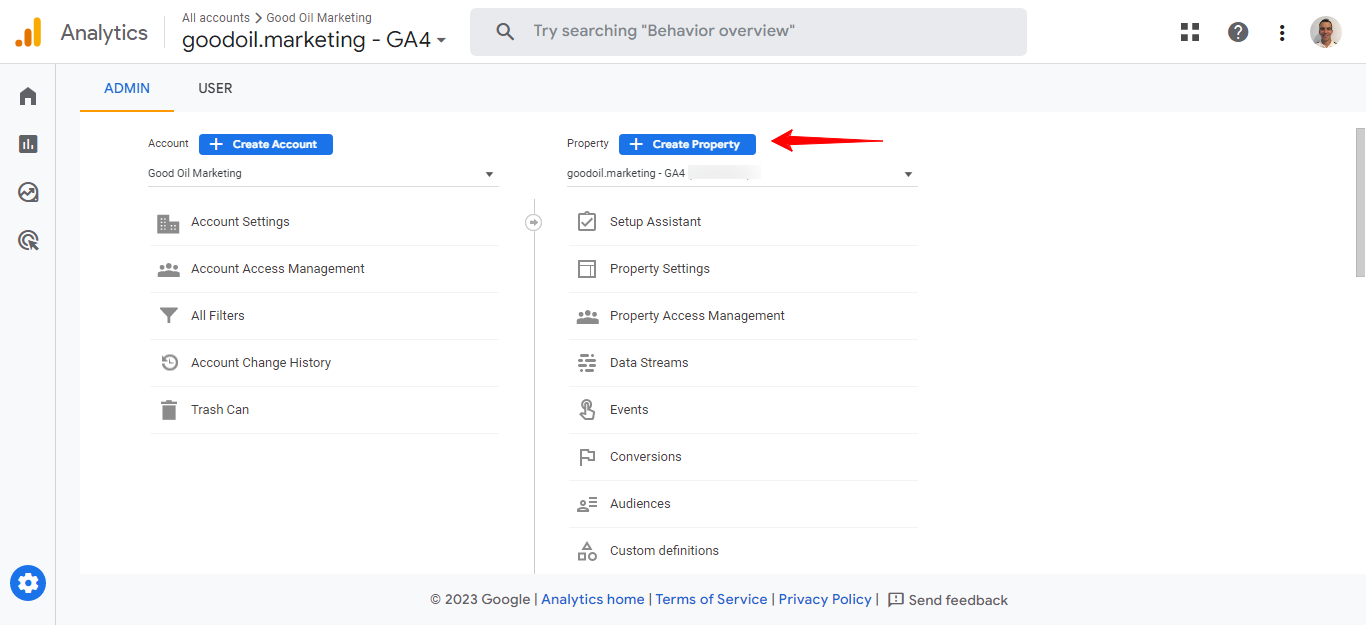
1. Create a Google Analytics 4 property:
– Sign in to your Google Analytics account.

– Click on the Admin tab.

– In the Property column, click on the dropdown and select “Create Property.”
– Select “Web” as the platform type after answering some questions about your needs

– Enter your website name and URL.

– Click on “Create.”
2. Install the GA4 tracking code on your website:
– From the Admin tab, select “Data Streams” under the Property column.
– Click on “Web” and enter your website URL.
– Click on “Create stream.”
– Copy the GA4 tracking code that appears on the screen.
– Paste the tracking code into the <head> section of all pages on your website.
3. Set up events and conversions:
– From the Admin tab, select “Events” or “Conversions” under the Property column.
– Click on “Create event” or “Create conversion” to set up a new event or conversion.
– Enter the details of the event or conversion, including the name, category, and action.
– Choose the trigger conditions for the event or conversion.
– Click on “Save.”
4. Verify your GA4 implementation:
– From the Admin tab, select “Debug” under the Property column.
– Click on “Realtime” and navigate to your website to ensure that events and conversions are being tracked correctly.
– Once you’ve verified your implementation, click on “Exit debug mode.”
That’s it team!
At this point, you might need a video tutorial to help, so we’ve searched YouTube for “How to set up Google Analytics 4” and found these as the top 3 recommended videos:
- https://youtu.be/xvt9x2lm5vw (11mins long – from the Analytics Mania channel)
- https://youtu.be/2oiVVKvcKZw (10 mins long – from the Google Analytics channel)
- https://youtu.be/hQQrTUuJIx8 (22 mins long – from the Stewart Gauld channel)
It’s important to note that GA4 operates differently from Universal Analytics (the previous version of Google Analytics), so you may need to spend some time learning how to navigate the new interface and use the new features.
Here are some articles we have found that will help with using the new Google Analytics 4:
Useful article from Martin Woodfield: https://www.mtraining.co.uk/blog/google-analytics-4-set-up-checklist
Introduction to GA4 from Google:
https://developers.google.com/analytics/devguides/collection/ga4
Ahrefs guide to using Google Analytics 4:
https://ahrefs.com/blog/how-to-use-google-analytics/
.
.
More Resources:
► How to get in the Google 3 Pack article
► YouTube Channel – loads of free training